The problem
While Unity is great to produce a level; it can be problematic to use a full level when your user can re-enter an already visited level especially if you need to remember some or all of the modifications he may have done.
In J.U.M.P, levels are setup such that you can re enter an already visited level, either from just getting back or by entering the level from elsewhere
As you re enter a level, lot of stuff has to happen
So what Unity can do for us about those needs ?
A solution would to use a manager of some sort that will be persistent accross the level thanks to DontDestroyOnLoad(). This manager will hold some ID of the gameObject that we want to remove on next visit.
The manager will have a RemoveID and a isRemovedID function that will be the only API needed for us to work.
For every gameObject you need to track, we will check in the Start method if it was already removed in a previous run, and remove it using Destroy. When we need to remove the object based on gameplay/user action, we will just need to call RemoveID
But how to ID a GameObject ? We need to uniquely identify any GameObject in a level. Unity comes with a nice instanceID for each GameObject that we can retrieve using gameObject.GetInstanceID(). How convenient !
But wait, there is a problem, the instanceID, while unique across the level is not persistent, that means everytime you save or load your scene the ID changes. That is pretty bad.
We need to come with a workaround. We can store the GetInstanceID() the first time the gameObject is added to the scene. For that Unity provide us with a nice Reset message that we can override in a MonoBehavior. This function will only be called once.
So lets create this UniqueID component:
While Unity is great to produce a level; it can be problematic to use a full level when your user can re-enter an already visited level especially if you need to remember some or all of the modifications he may have done.
In J.U.M.P, levels are setup such that you can re enter an already visited level, either from just getting back or by entering the level from elsewhere
As you re enter a level, lot of stuff has to happen
- Did you pickup some coins/time in your previous visit ? It is better if they can be automatically removed
- Did you pickup a key/open a grid ? The key should not be there anymore and the door should be already open
- Did you already see the introduction cut scene of that level ? No need to see it again
- Based on your gameplay, a lot more need to not be done the second time you visit a level
So what Unity can do for us about those needs ?
A solution would to use a manager of some sort that will be persistent accross the level thanks to DontDestroyOnLoad(). This manager will hold some ID of the gameObject that we want to remove on next visit.
The manager will have a RemoveID and a isRemovedID function that will be the only API needed for us to work.
For every gameObject you need to track, we will check in the Start method if it was already removed in a previous run, and remove it using Destroy. When we need to remove the object based on gameplay/user action, we will just need to call RemoveID
But how to ID a GameObject ? We need to uniquely identify any GameObject in a level. Unity comes with a nice instanceID for each GameObject that we can retrieve using gameObject.GetInstanceID(). How convenient !
But wait, there is a problem, the instanceID, while unique across the level is not persistent, that means everytime you save or load your scene the ID changes. That is pretty bad.
We need to come with a workaround. We can store the GetInstanceID() the first time the gameObject is added to the scene. For that Unity provide us with a nice Reset message that we can override in a MonoBehavior. This function will only be called once.
So lets create this UniqueID component:
UniqueID C# script
 using UnityEngine;
using System.Collections;
public class UniqueID
 : MonoBehaviour
{
  public int hash;
  void Reset ()
  {
    hash = gameObject.GetInstanceID();
  }
}
Pretty simple and straight forward.
Now lets move on our Manager that will hold the objects we need to remove when reentering a level. It will use the singleton pattern and will be persistent over all the levels. So you should add it to a GameObject that will be available from the start.
As the UniqueID is unique in a given level, we will need to store a list of IDs per level, as we are not sure that given 2 differents levels, there won't be any clash.
So basically we will use a Dictionnary where the Key is the levelName and the Value is a list of ints corresponding to the UniqueID.hash of every object we have tracked.
I used theApplication.loadedLevelName and not Application.loadedLevel as you may add and rearrange levels in your build, which would modify level numbering and might cause problems if you save the dictionnary.
The isRemoveID will just check that we the id in the list of tracked ids in the current level.
The RemoveID will store the id in the list. It will first create the list for the current level if it is not yet created
UniqueIDMgr C# script
 using UnityEngine;
using System.Collections;
using System.Collections.Generic;

public class UniqueIDMgr
  : MonoBehaviour
{
  // for singleton pattern
  static private UniqueIDMgr self = null;
  // will store all already tracked ids, per level
  static Dictionary< string, HashSet< int > > hashes = new Dictionary> ();

  void Start ()
  {
    // singleton check
    if (self == null) {
      self = this;
      // prevent unloading
      DontDestroyOnLoad (gameObject);
    } else {
      // destroy this instance, as there is already one
      DestroyImmediate (gameObject);
    }
  }

  static public bool isRemovedID (UniqueID id)
  {
    // first check that we have at least a hashset for the current level
    if (!hashes.ContainsKey (Application.loadedLevelName))
      return false;
    // check if the id.hash is in the table
    return hashes [Application.loadedLevelName].Contains (id.hash);
  }

  static public void RemoveID (UniqueID id)
  {
    // first check that if we don't have a hashset for that level, create it
    if (!hashes.ContainsKey (Application.loadedLevelName))
      hashes.Add (Application.loadedLevelName, new HashSet ());
    // if the id.hash is not yet added, add it to the table
    if (!hashes [Application.loadedLevelName].Contains (id.hash))
      hashes [Application.loadedLevelName].Add (id.hash);
  }
}
Now we have our system in place, we can start using it
We will create a Pickup script to illustrate the UniqueID/UniqueIDMgr API
Lets pretend the Pickup object will be removed when the player hit it using a collider/trigger. The collsion function will then call the our UniqueIDMgr.RemoveID function
In the Start function, we will check that our pickup has not been removed in previous runs. Based on the result we can either do our normal Start code or do some specific code. For exemple in J.U.M.P, the door will be started in 'open' state if it has been already opened previously.
As we need to have a UniqueID for the Pickup object to behave correctly, we add a [RequireComponent( typeof( UniqueID ) )] to the script so everytime you add a Pickup component, it will add a UniqueID to the gameObject
Pickup C# script
 using UnityEngine;
using System.Collections;

[RequireComponent( typeof( UniqueID ) )]
public class Pickup
: MonoBehaviour
{
        // hold the UniqueID reference
        private UniqueID id;

        void Awake()
        {
                // grab the reference
                id = GetComponent< UniqueID >();
        }

        void Start ()
        {
                // check if already removed
                if( UniqueIDMgr.isRemovedID( id ) )
                {
                        // so destroy it
                        Destroy( gameObject );
                        // maybe you need to do more stuff, like display another mesh etc...
                }
                else
                {
                        // normal code
                }
        }

        // this will be called by your gameplay code when the pickup is actually picked
        // usually from a 'OnTriggerEnter' or 'OnCollisionEnter' on the collider of this gameObject
        void RemoveFromGame()
        {
                // tell the manager that this ID is removed
                UniqueIDMgr.RemoveID( id );
        }
}
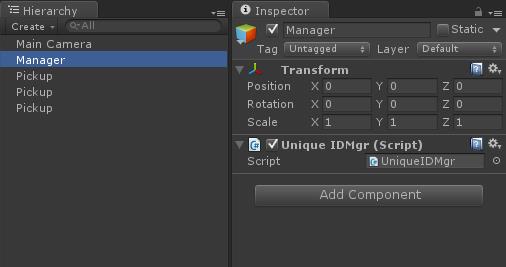
The manager
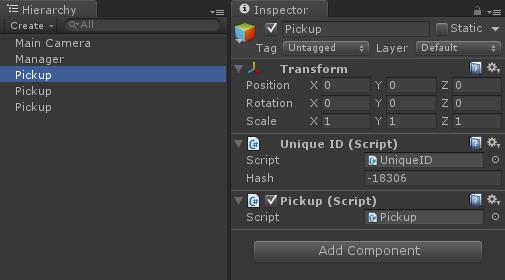
One pickup with its UniqueID
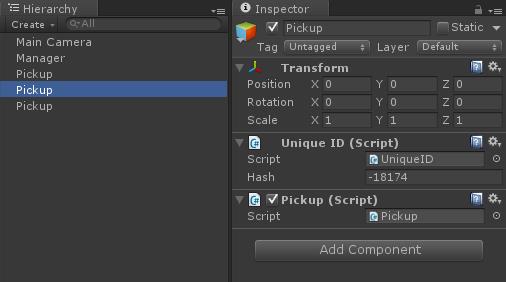
Another pickup with different ID
Look like everything is nice and simple
Problem again
Unfortunatly this is not the end of our journey.
If you create a prefab from one of the Pickup object and instanciate it in the scene or even if you just Duplicate the object (CTRL-D) the Reset method is not called and hence we end up with 2 objects with the same ID, preventing us to use correctly the UniqueIDMgr
Solution again
I have not find a way to intercept duplication or prefab instanciation in Unity editor for calling Reset myself.
However we can create an editor window that will take care of setting up the hash member of our UniqueIDs by just pressing a button :
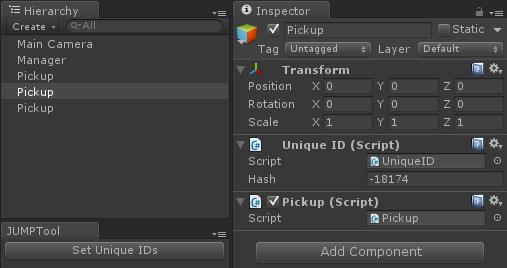
Using an EditorWindow we can grab all UniqueID components in the scene and then set up the hash member using the gameObject.GetInstanceID(). This will make sure we don't have duplicate anywhere in the scene.
However a last problem might occurs, if we made a prefab, changing the hash member will not be saved, even if correctly displayed the first time in the Inspector. We need to notify Unity that it is an override value of the prefab instance.
Fortunatly Unity provides with PrefabUtility.RecordPrefabInstancePropertyModifications(). So we just call it when we have a UniqueID in a prefab.
To avoid any problem, we just remove the Reset function from the UniqueID script, leaving just a public member.
JUMPTool editor window C# script
should be under an 'Editor' folder in your 'Assets' folder
should be under an 'Editor' folder in your 'Assets' folder
 using UnityEngine;
using UnityEditor;
using System.Collections;
using System.Collections.Generic;

public class JUMPTool
:   EditorWindow
{
  [MenuItem("Window/JUMP tool")]
    static void Init()
    {
    JUMPTool win = (JUMPTool)EditorWindow.GetWindow (typeof (JUMPTool));
    win.Show();
    }

  void OnGUI()
  {
    if( GUILayout.Button( "Set Unique IDs" ) )
      SetIDs();
  }

  void SetIDs()
  {
    // Grab all UniqueID object in the scene
    UniqueID[] uniques = FindObjectsOfType( typeof(UniqueID) ) as UniqueID[];
    foreach( UniqueID uid in uniques )
    {
      // set the hash to the InstanceID of the gameObject
      uid.hash = uid.gameObject.GetInstanceID();
      // if the gameObject is part of a prefab,
      // we need to change the instance value, so that the modification is recorded/saved
      if( PrefabUtility.GetPrefabType( uid ) == PrefabType.PrefabInstance )
      {
        PrefabUtility.RecordPrefabInstancePropertyModifications( uid );
      }
    }
  }
}
Final words
IMHO the solution is quite simple, a caveat is that you need to press the button to for setting unique ID before saving to make sure you don't have any duplicates.
It might be intersting to know if Unity provide a way to be notified when a scene is saved to automatically set the IDs.
Bonus:
If you have a serialisation function for savegame, you can add the UniqueIDMgr hashes dictionnary to it.
 RSS Feed